I am doing a wedding next month, I know crazy being 8 months pregnant, but I am really excited. It is going to be so fun! The wedding colors are mint (like mint ice cream), gold and cream. The bride wants roses and what ever else would look good.
I got really excited thinking about using mint colored succulents. I love succulents, they are so cool. They are pretty much the only way to bring the mint color into her arrangements without using massive amounts of ribbon.
Anyways I wanted to share my inspiration board with you and see what you think.
If you are a little confused about why I am doing wedding flowers, let me explain. I have a bachelors in Horticulture with an emphasis in floral design. I really only do family members weddings right now, when I am asked, but I would love to have my own wedding and event floral business in the future (maybe after this baby is a few months old). If you would like to check out my portfolio, there is a link on the top bar.
Wednesday, May 15, 2013
Faux Chenille Blanket
I have made a couple of these types of blankets and I love them. They are always so soft when they are finished. I love the way this one has turned out! I can definitely tell a big difference in the quality and accuracy of my sewing since the last time I made one. It is nice to see that I am improving!
If you would like this little beauty for your own, you can check out my etsy page (there's a link in the top bar just below the banner) and purchase it for yourself or someone special. If you would like a blanket like this but in different colors feel free to email me and I would love to work something out for you.
Labels:
baby blanket,
Blanket,
Faux Chenille Blanket,
orange,
pink,
red,
Soft
Monday, May 13, 2013
Simply Color Quilt Continued
Making Blocks:
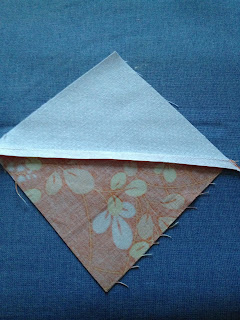
In this post I explained the first steps of this quilt. After cutting the squares out of the patterned fabric and out of the white background fabric. I paired a patterned square with a white square and put them right sides together. I marked with a pencil from one corner to the opposite corner .
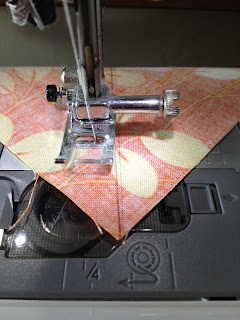
I then took all of my squares, that are marked, down to my sewing machine. With a 1/4" seam sew on each side of the marked line. To save time and thread I fed the squares in a chain.
After I sewed down each side of the diagonal line, I cut on the pencil line through both fabrics. I prefer to do this with my shears but you can definitely do this with your rotary cutter.
Look at all those lovely triangles waiting to be pressed!
Next I press the seam to the patterned piece.
Laying out the Pattern:
Now for the fun part! This is why I love half square triangle quilts so much, There are so many different ways you can put the triangles together. I went on pinterest and searched for different HST designs and tried them out. These are some of my favorites and I ended up liking the first one on the left the best.
Friday, May 10, 2013
Twirly Skirt
It is starting to turn to summer weather here in Idaho, its about time right!! I was going through K's closet and noticed that she doesn't really have any summer attire that fits her.
I have had this tutorial saved in my pinterest for about 2 years now. I love Dana's tutorials. They are always easy to follow and get great results. A couple of weeks ago I spotted some cute fabric at Joann's and thought that it would be great fabric to make K and L matching outfits out of. I still haven't decided what the outfit for L should look like, so stay tuned for that.
I really liked how this skirt turned out. I think I will make the next ones a little longer. I would love to try and make the double layered skirt.
I used 1/2 inch elastic, instead of 1 inch, and I think that it works a little better for this age and size. I think that 1 inch would have made it a little too bulky at the top.
I think she likes it!
Wednesday, May 8, 2013
Half square triangle quilt: simply color
I shared in this post a while ago about these fabrics and how I absolutely love them! I love how they correspond with the colors and patterns that I want to decorate the girls room with. The line is called Simply Color. It was designed by V& Co and it is distributed by Moda!
I acquired some fat quarters and a charm pack in this line. I have decided to make a quilt for each girls bed. This first one I am going to show you is for my two year old, K, and I am going to make it a twin size.
I decided that for this quilt that I was going to make another Half Square Triangle Quilt. I love HST Quilts, if you haven't been able to tell. I love that you can make so many different designs with just technique. I will branch out and do different kinds of quilts in the future, I promise.
I decided that I wanted my blocks to be 4.5 inches wide. So I cut strips from the fat quarters at 5 inches across. I was able to get three 5 inch strips from each fat quarter. I also cut a 2.5 inch strip from what was left over to use later for binding.
I then cut each strip to make 5 inch squares. I also cut one yard of white background fabric into 5 inch squares. This can easily be made with pre-cut charm packs. They are already cut for you at 5 inches square and come in an assortment of patterns within a fabric line.
Stay tuned for the next steps in making a HST Quilt! TO BE CONTINUED...
Monday, May 6, 2013
Split Rail Fence Quilt: Part 3
Finishing The Quilt Top
After I finished sewing all of the blocks, I trimmed them to 13 inches square. When you are making your own make sure to measure your blocks to figure out what you should square them to. This is due to differences in sewing and pressing techniques.
A jelly roll makes 12 blocks, so I decided to lay my quilt out in a 4 by 3 pattern. As I was laying out my quilt top and decided where each block should go I was keeping color composition and pattern in mind. After I was happy with the layout I took a picture so I could look back and reference it.
I then sewed the blocks together into strips. I like to mark each row with a post-it note with its number. I had a total of 4 rows, each with 3 blocks in it.
After sewing the rows, I then sewed the rows together to make the quilt top. When I sew quilt rows together I like to put a pin at each intersection and then one pin in the center of the block. This makes sure that the rows are perfect and the intersections line up.
Also I like to make my intersections "lock" so they line up perfectly.
The way I do this is I press all of the seems on one row to the left and
then on the other row I press all of the seems to the right. You can
see this demonstrated in the picture above.
And now for the finished quilt top!! What do you think??
Linked to:Craft-o-maniac
Keeping it Simple
Wednesday, May 1, 2013
Upgraded boxed brownies
Brownies are a staple at our house. I decided that I would try and upgrade the regular old boxed brownies we have all the time.
I decided to make a graham cracker crust. They are pretty easy to make. Just crushed graham crackers, a little bit of sugar and some melted butter. I sprayed the bottom of a 9 by 13 pan and pressed the graham cracker crust I to the bottom of it.
I then made the brownies according to the box directions and poured them on top of the graham cracker crust. I then baked them according to the box directions. In the last 5 minutes of cooking time, I sprinkled mini marshmallows over the top of the brownies.
They were really yummy. They tasted like a fancy s'more. Enjoy!
Subscribe to:
Comments (Atom)


